Appearance
Onboarding via Publisher
Why Choose Publisher Portal?
The Publisher Portal is a web-based platform that provides a graphical interface for publishing AI services to the SingularityNET marketplace. This method is ideal when you want maximum visibility and ease of use.
Method Comparison
| Aspect | Publisher Portal | CLI | TUI |
|---|---|---|---|
| Interface | Web browser GUI | Command line | Terminal menus |
| Marketplace UI Demo | ✅ Yes (optional) | ❌ No | ❌ No |
| Team Collaboration | ✅ Multiple users | ⚠️ Single user | ⚠️ Single user |
| Technical Expertise | Beginner-friendly | Advanced | Intermediate |
| Automation Support | ❌ Manual process | ✅ Scriptable | ⚠️ Limited |
When to Use Publisher Portal
Choose this method if:
- You want users to test your service directly in the Marketplace with a demo UI
- Multiple team members need to manage the organization/service
- You prefer visual interfaces over command-line tools
- You plan to create a custom UI demo for better service presentation
- Service discoverability and user engagement are priorities
Limitations to Consider
- No automation - All steps must be done manually through the web interface
- Browser dependency - Requires MetaMask extension and modern web browser
- Not suitable for CI/CD - Cannot be integrated into automated pipelines
Service Accessibility After Publishing
Services published via Publisher Portal are accessible through:
- Marketplace Web UI - Users can test directly with your custom demo
- CLI - Developers can call via command line
- SDK - Integration into applications (Python, JavaScript, etc.)
Note: This is the only method that allows creating marketplace UI demos. Services published via CLI or TUI can only be accessed programmatically.
Alternative Methods
Not sure if Publisher Portal is right for you? Check these alternatives:
- CLI - For automation and programmatic control
- TUI - Terminal interface with guided menus
- Full Comparison Guide - Detailed comparison of all three methods
You can watch the video for easy understanding:
Organization Setup
Follow these simple steps to register your organization clearly and quickly on the SingularityNET Publisher Portal.
Step 1: Access the Publisher Portal
To begin publishing your AI services, open the Publisher Portal:
- Go to https://publisher.singularitynet.io in your browser.
Once on the page, you have two main options to proceed:
Click Get Started to begin the registration flow.
This button will take you directly to the account login and onboarding process.
Alternatively, you can explore the How It Works section at the top to learn more about the platform.
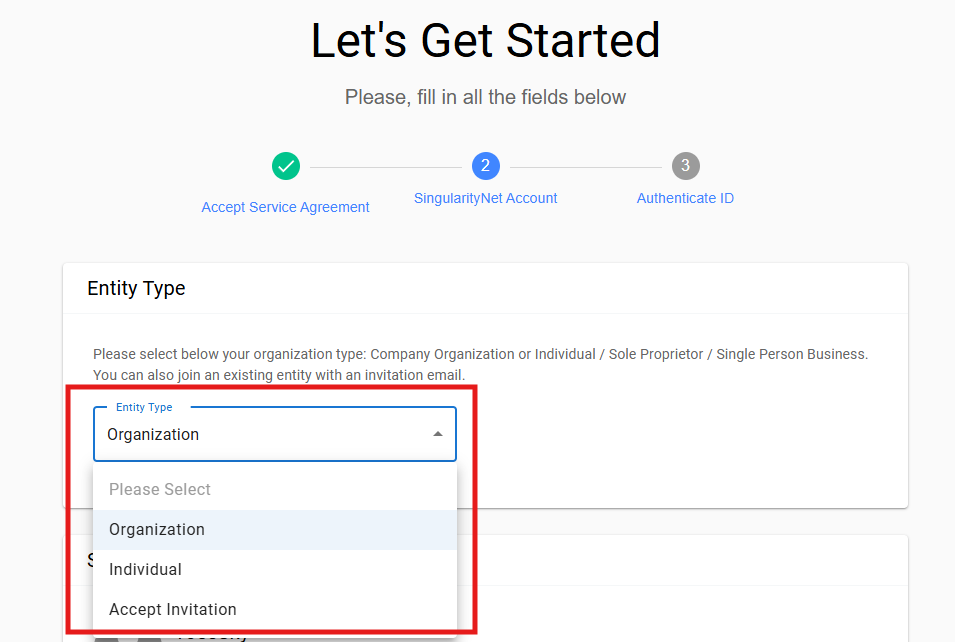
Step 2: Choose Organization Type
Select the most appropriate option based on how you plan to publish services:
Organization (for teams, companies, or formal business entities)
Recommended if your services are backed by a legal entity or team collaboration.
Individual (for solo developers or contributors)
Choose this if you are publishing services personally, without affiliation to a registered company.
Accept Invitation (join an existing organization)
Use this if you received an invitation to join a team that already exists in the Publisher Portal.
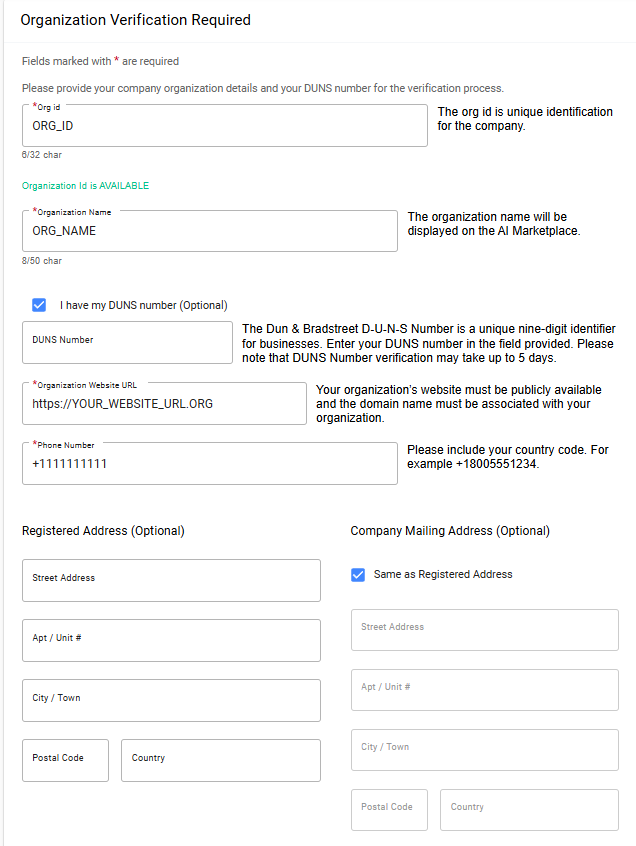
Step 3: Fill Organization Details
Provide clear and accurate information:
Org ID (required)
Unique ID used by CLI/SDK users.
Organization Name (required)
Publicly visible name on the marketplace.
DUNS Number (optional)
Unique business identifier (skip if unavailable).
Website URL (required)
Official organization website.
Phone Number (required)
Contact number with country code.
Registered Address (optional)
Official business registration address.
Mailing Address (optional)
Default is the registered address if not provided.
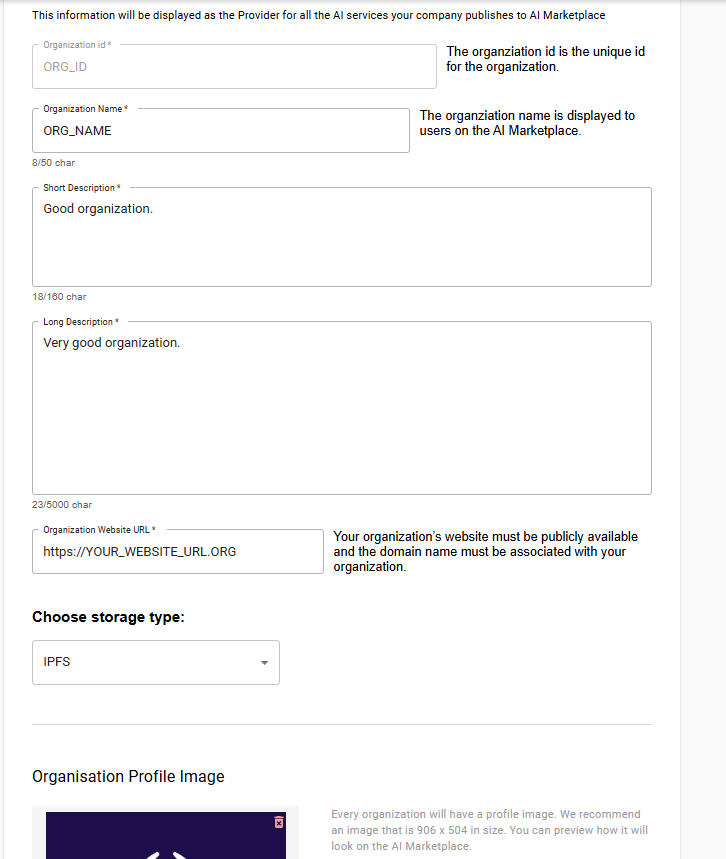
Step 4: Add Descriptions & Visuals
Make your organization stand out clearly to potential users:
Org ID (required)
Unique ID used by CLI/SDK users.
Short Description (required, max 160 chars)
Concise summary visible on the marketplace.
Long Description (required, max 5000 chars)
Detailed organization profile with objectives and services.
Website URL (required)
Official organization website.
Choose Storage Type (required)
Select where your service assets (e.g., icons, metadata) will be stored:
- IPFS – Use standard decentralized IPFS storage.
- Filecoin – Store files via Lighthouse on the Filecoin network. Requires a Lighthouse API Key for uploading.
Lighthouse API Key (only for Filecoin)
Needed to upload files via Lighthouse. Generate it from your Lighthouse dashboard after signing up.
Organization Profile Image (required)
Visual identity for your organization on the marketplace.
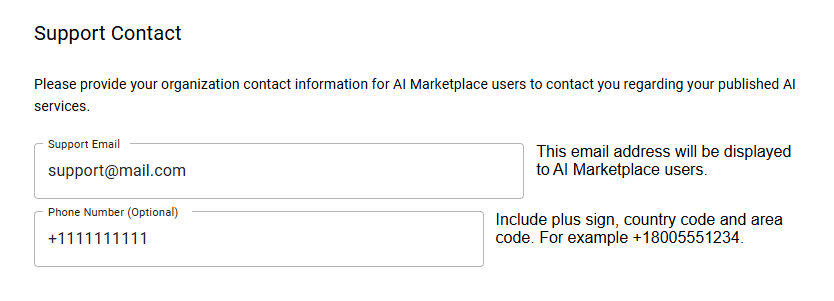
Step 5: Set Up Support Information
Provide users easy ways to contact you:
Support Email (required)
For user inquiries and assistance.
Support Number (optional)
Additional phone contact for support.
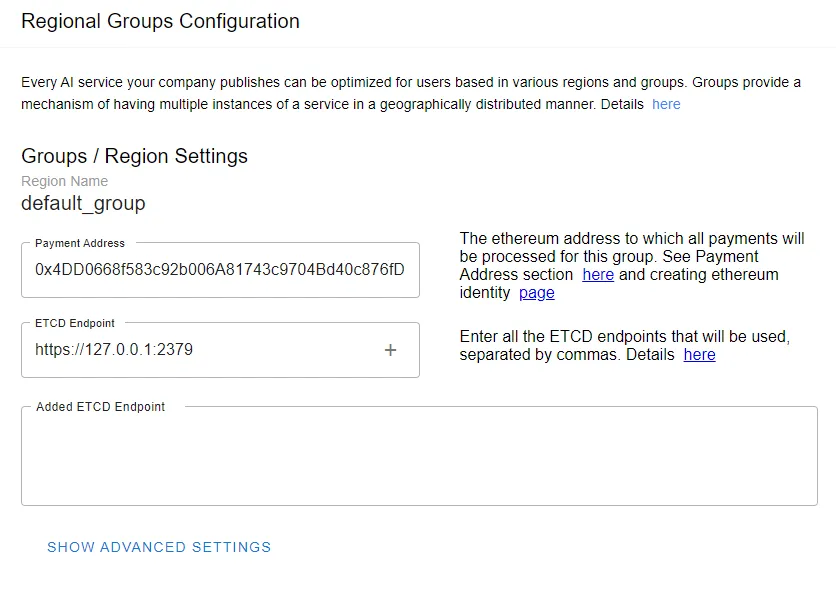
Step 6: Configure Payment & ETCD
Critical settings for secure operations:
Payment Address (required)
Ethereum address to receive ASI (FET) tokens.📌 Ensure secure access to this address.
ETCD Endpoint (required)
Default internal ETCD endpoint:URLhttp://127.0.0.1:2379📌 Public setups require accessible ETCD endpoint
(e.g.,http://etcd.yourdomain.com:2379).
More info here.
Step 7: Confirm and Publish
Finalize your organization's blockchain registration:
- Click Connect MetaMask and confirm ownership of your Ethereum wallet address to complete the registration process.
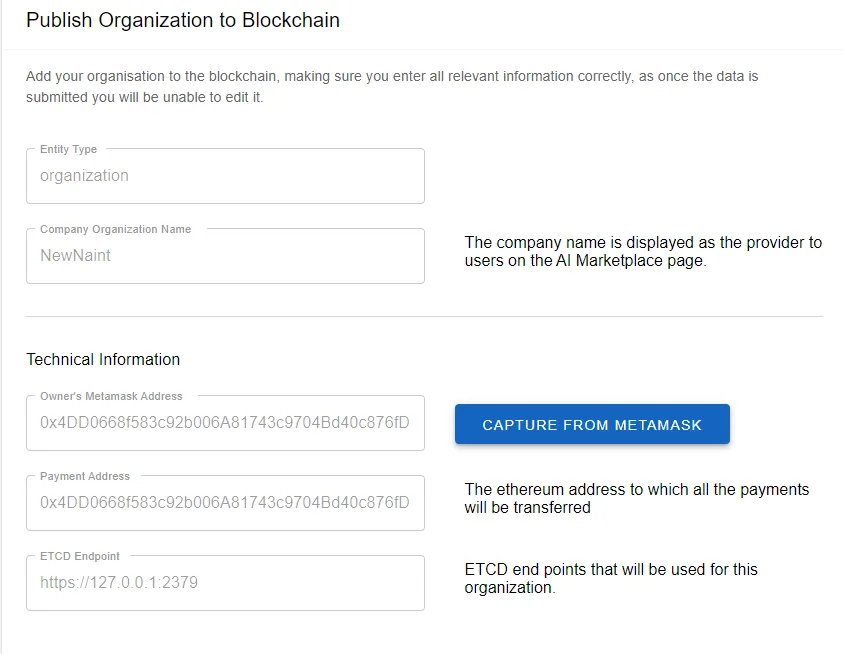
- Sign the publishing transaction via MetaMask to register your organization on the blockchain.
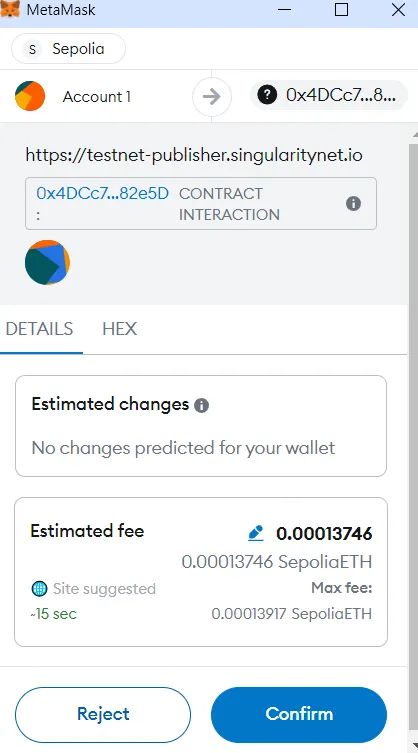
✨ Your organization is now successfully registered!
Service Setup
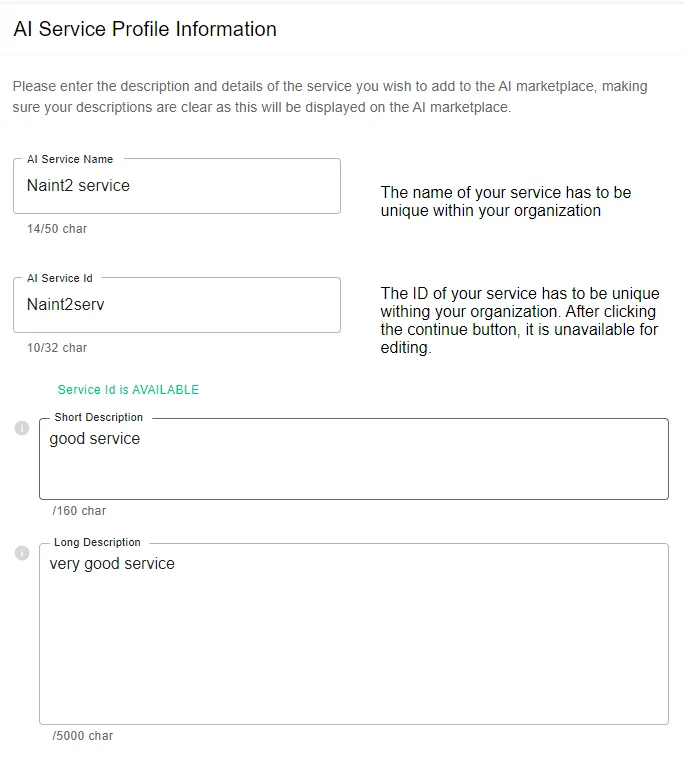
Step 1: Basic Service Information
Provide the essential information about your AI service:
AI Service Name (required, max 50 chars)
The name users will see on the marketplace.
Service ID (required)
Unique identifier for your service, used by CLI or SDK users.
Short Description (required, max 160 chars)
Brief summary displayed on the marketplace.
Long Description (required, max 5000 chars)
Detailed explanation of your AI service’s capabilities, functionalities, and use cases.
Step 2: Additional Service Details
Enhance discoverability and presentation on the marketplace:
Tags (optional, max 20)
Relevant keywords that help users discover your service.
Project URL (required)
Link to the publicly accessible service website associated with your organization.
Contributors (required)
Names or identifiers of contributors involved in creating your service.
AI Service Profile Image (required)
Visual representation of your AI service on the marketplace.

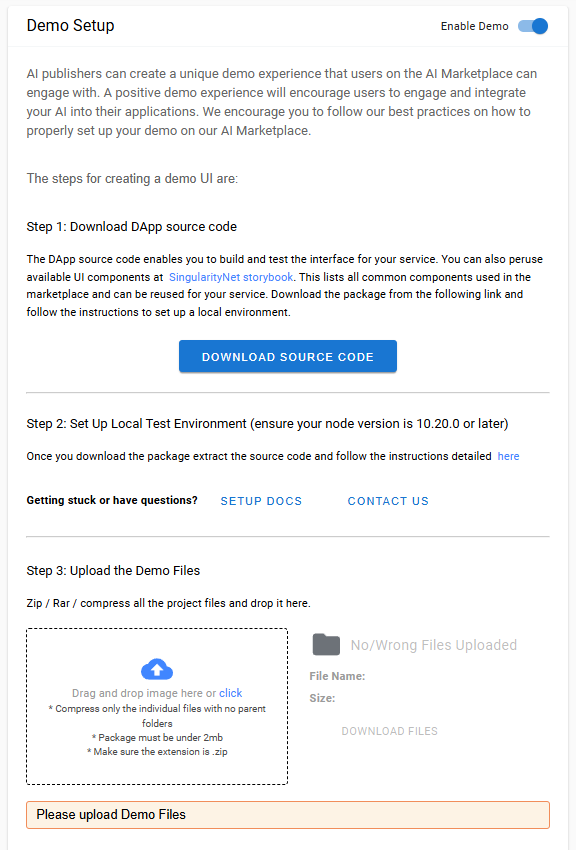
Step 3: UI Demo Settings
Configure how users will interact with your service through the Marketplace interface:
Enable Demo (required)
Turn OFF if the service is available only via CLI/SDK, or ON if you want users to test it directly on the marketplace via a web-based UI.
Upload Demo Files (optional)
Upload a
.ziparchive containing your custom UI files for the service demo.You can create your own interface using the UI Sandbox Portal — learn more here.
⚠️ UI Processing Delay
After uploading your UI archive, processing may take up to 5 minutes.
Even if you finish all steps, the UI may not appear immediately. Just wait a few minutes and refresh the page.
Step 4: Daemon Configuration
Deployment Options
You have two options for deploying your daemon:
Option 1: Hosting-as-a-Service (HaaS) - Managed infrastructure (recommended for most users)
- Fully automated deployment and maintenance
- No server setup or ETCD configuration required
- Monthly subscription in FET tokens
- See the HaaS Guide for one-click deployment
Option 2: Self-Hosted Daemon - Manual infrastructure setup
- Full control over infrastructure
- Requires server, SSL certificates, and ETCD configuration
- Follow the steps below for self-hosted setup
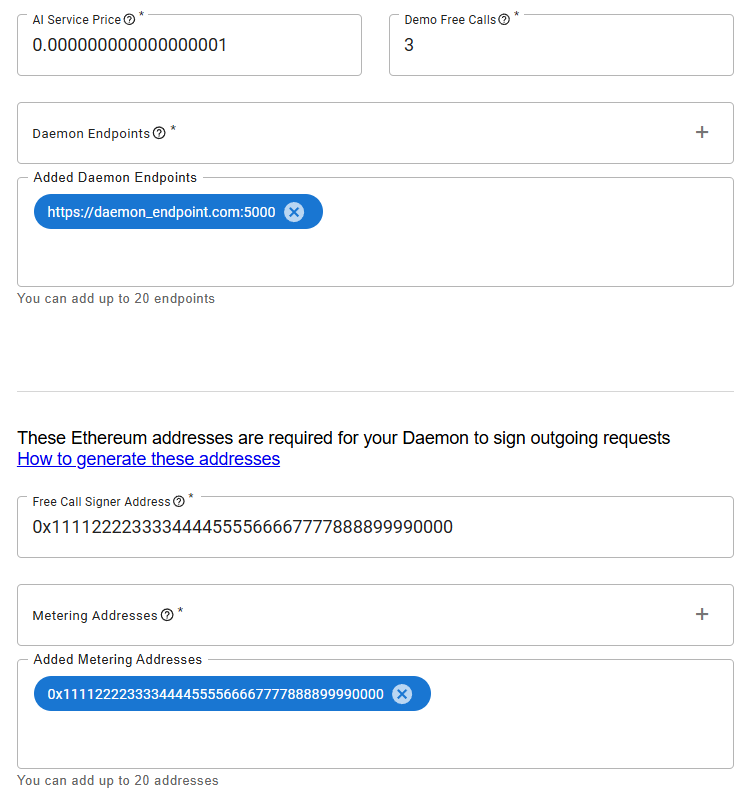
Self-Hosted Daemon Configuration
If you choose to self-host your daemon, define the following critical settings:
AI Service Price (required)
Specify the price in ASI (FET) tokens per individual service call.
Demo Free Calls (required)
Set the number of free trial calls new users can make.
Daemon Endpoint (required)
Publicly accessible URL where your daemon will be hosted. Must start with
https://.Metering Address and Free Call signer (Ethereum public address) (required)
Generate a keypair for metering and free-call authentication using either a Python script or the built-in
snetdDaemon tool:
bash
./snetd generate-keypython
from eth_account import Account
import secrets

key = secrets.token_hex(32)
acct = Account.from_key(key)
print("SAVE BUT DO NOT SHARE PRIVATE KEY")
print("Private key: ", key)
print("Address: ", acct.address)
📌 Important: Keep your private key secure and confidential.
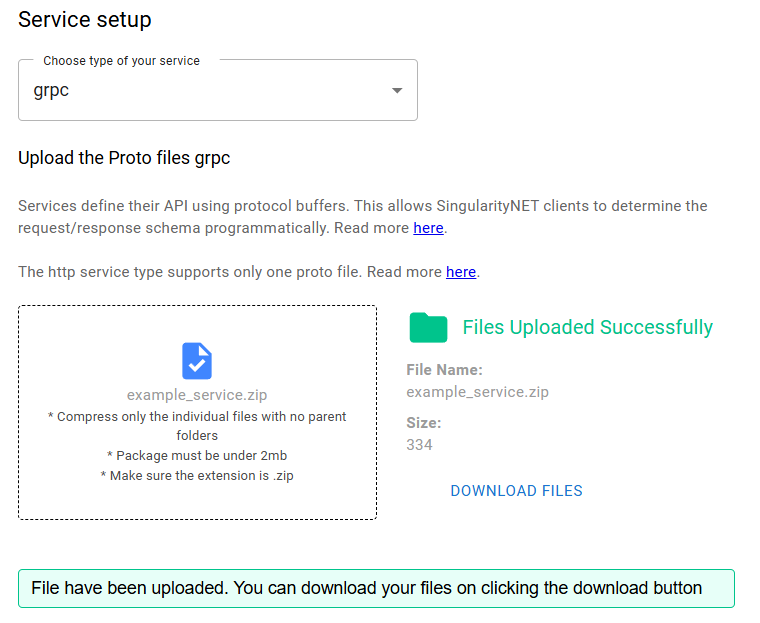
Step 5: Service Type and Proto Files
Complete your AI service definition:
Service Type (required)
Choose your service implementation type —
grpcorhttp. See the guides above to learn how to set up each type.Upload Proto Files (required)
Upload a
.ziparchive containing the.protodefinition files for your AI service.
Step 6: Confirm & Publish
- After filling in all required information, click to confirm and launch your AI service.
- Confirm the transaction using MetaMask to complete the publication process.
✨ Your AI service is now successfully published!
Set Up & Launch the Daemon
Note: This section is for self-hosted daemon deployment. If you used Hosting-as-a-Service (HaaS) during Step 4, your daemon is already deployed and you can skip this entire section.
This section explains how to configure, install, and run the SingularityNET Daemon manually, which manages billing, service requests, and blockchain interaction for your AI service.
🚩 Step 1: Preparation Steps
Before you run your daemon, complete the following preparations:
1.1 Generate Alchemy API Key
Follow the Alchemy API Key Setup Guide to generate your API key.
Add these keys to your daemon configuration:
- Mainnet:
json
"ethereum_json_rpc_http_endpoint": "https://eth-mainnet.g.alchemy.com/v2/<YOUR_API_KEY>",
"ethereum_json_rpc_ws_endpoint": "wss://eth-mainnet.g.alchemy.com/v2/<YOUR_API_KEY>"- Testnet (Sepolia):
json
"ethereum_json_rpc_http_endpoint": "https://eth-sepolia.g.alchemy.com/v2/<YOUR_API_KEY>",
"ethereum_json_rpc_ws_endpoint": "wss://eth-sepolia.g.alchemy.com/v2/<YOUR_API_KEY>"
Replace <YOUR_API_KEY> with your actual Alchemy API key.
1.2 Generate Metering and Free Call Private Key
You can generate a keypair for metering and free-call authentication using either a Python script or the built-in snetd Daemon tool:
bash
./snetd generate-keypython
from eth_account import Account
import secrets

key = secrets.token_hex(32)
acct = Account.from_key(key)
print("SAVE BUT DO NOT SHARE PRIVATE KEY")
print("Private key: ", key)
print("Address: ", acct.address)
Save your private key securely.
🚩 Step 2: Download & Install the Daemon
Download the latest version of the SingularityNET daemon from the official GitHub repository:
Select the appropriate binary for your operating system (e.g., linux-amd64, linux-arm64, darwin-amd64, or windows-amd64) from the latest release:
Example command for Linux (amd64):
bash
wget https://github.com/singnet/snet-daemon/releases/latest/download/snetd-linux-amd64-v6.2.0
chmod +x snetd-linux-amd64-v6.2.0
sudo mv snetd-linux-amd64-v6.2.0 /usr/bin/snetd
📌 Ensure the daemon binary has executable permissions (
chmod +x) before moving it to/usr/bin.
🚩 Step 3: Configure Daemon (snetd.config.json)
Below is a complete example configuration, assuming you're using embedded ETCD (default, recommended for most setups).
📌 If you're deploying a public ETCD instance (advanced setups), specify your public ETCD endpoint in the configuration below. More information on ETCD setup here.
json
{
  "blockchain_enabled": true,
  "blockchain_network_selected": "sepolia",

  "daemon_endpoint": "0.0.0.0:<DAEMON_PORT>",
  "daemon_group_name": "<DAEMON_GROUP>",

  "organization_id": "<ORGANIZATION_ID>",
  "service_id": "<SERVICE_ID>",
  "service_endpoint": "http://<SERVICE_HOST>:<SERVICE_PORT>",

  "ssl_cert": "<PATH_TO_DOMAIN_CERTS>/fullchain.pem",
  "ssl_key": "<PATH_TO_DOMAIN_CERTS>/privkey.pem",

  "metering_enabled": true,
  "metering_endpoint": "https://marketplace-mt-v2.singularitynet.io",
  "private_key_for_metering": "<METERING_KEY>",

  "private_key_for_free_calls": "<FREE_CALL_KEY>",

  "ethereum_json_rpc_http_endpoint": "https://eth-sepolia.g.alchemy.com/v2/<YOUR_API_KEY>",
  "ethereum_json_rpc_ws_endpoint": "wss://eth-sepolia.g.alchemy.com/v2/<YOUR_API_KEY>",

  "payment_channel_storage_server": {
    "client_port": 2379,
    "cluster": "storage-1=http://127.0.0.1:2380",
    "data_dir": "data.etcd",
    "enabled": true,
    "host": "127.0.0.1",
    "id": "storage-1",
    "log_level": "info",
    "peer_port": 2380,
    "scheme": "http",
    "startup_timeout": "1m",
    "token": "your-unique-token"
  },

  "log": {"level": "debug", "output": {"type": "stdout"}}
}
json
{
  "blockchain_enabled": true,
  "blockchain_network_selected": "main",

  "daemon_endpoint": "0.0.0.0:<DAEMON_PORT>",
  "daemon_group_name": "<DAEMON_GROUP>",

  "organization_id": "<ORGANIZATION_ID>",
  "service_id": "<SERVICE_ID>",
  "service_endpoint": "http://<SERVICE_HOST>:<SERVICE_PORT>",

  "ssl_cert": "<PATH_TO_DOMAIN_CERTS>/fullchain.pem",
  "ssl_key": "<PATH_TO_DOMAIN_CERTS>/privkey.pem",

  "metering_enabled": true,
  "metering_endpoint": "https://marketplace-mt-v2.singularitynet.io",
  "private_key_for_metering": "<METERING_KEY>",

  "private_key_for_free_calls": "<FREE_CALL_KEY>",

  "ethereum_json_rpc_http_endpoint": "https://eth-mainnet.g.alchemy.com/v2/<YOUR_API_KEY>",
  "ethereum_json_rpc_ws_endpoint": "wss://eth-mainnet.g.alchemy.com/v2/<YOUR_API_KEY>",

  "payment_channel_storage_server": {
    "client_port": 2379,
    "cluster": "storage-1=http://127.0.0.1:2380",
    "data_dir": "data.etcd",
    "enabled": true,
    "host": "127.0.0.1",
    "id": "storage-1",
    "log_level": "info",
    "peer_port": 2380,
    "scheme": "http",
    "startup_timeout": "1m",
    "token": "your-unique-token"
  },

  "log": {"level": "debug", "output": {"type": "stdout"}}
}
DANGER
For each reference to the embedded ETCD configuration in the daemon, do not delete the directory specified by data_dir. Deleting this folder will remove access to payment channel storage and prevent token withdrawals.
🚩 Placeholders to Replace
| Placeholder | Explanation |
|---|---|
<DAEMON_PORT> | Port for the daemon (e.g., 7000). |
<DAEMON_GROUP> | Daemon payment group (default_group). |
<ORGANIZATION_ID> | ID from your registered organization. |
<SERVICE_ID> | ID from your published service. |
<SERVICE_HOST> | IP or hostname of your AI service. |
<SERVICE_PORT> | Port number your service listens on. |
<PATH_TO_DOMAIN_CERTS> | Path to your SSL domain certificates. |
<METERING_KEY> | Private key generated for metering. |
<FREE_CALL_KEY> | Private key generated for free calls. |
<YOUR_API_KEY> | Alchemy API key (see preparation step). |
🚩 Configuration Fields Explained
| Field | Description |
|---|---|
blockchain_enabled | Enables blockchain integration (true). |
blockchain_network_selected | Network: main (Mainnet) or sepolia (Testnet). |
daemon_endpoint | Address and port where daemon listens. |
daemon_group_name | Payment group name. |
organization_id, service_id | IDs linking to your published org and service. |
service_endpoint | Your AI service's internal URL. |
ssl_cert, ssl_key | Paths to SSL certificate files. |
metering_enabled, metering_endpoint | Metering settings; usually remain unchanged. |
private_key_for_metering | Private Ethereum key for service call metering. |
private_key_for_free_calls | Private Ethereum key for service call free call. |
ethereum_json_rpc_http/ws_endpoint | Blockchain connection endpoints. |
payment_channel_storage_server | Embedded ETCD configuration; no modification if default. |
log | Logging settings for daemon operations. |
🚩 Step 4: Launch the Daemon
Save your configuration and run the daemon using these commands:
bash
screen -S daemon_session
snetd -c snetd.config.json
📌 Using
screenensures the daemon remains active even after closing your terminal.
Upon successful startup, the daemon will show this confirmation:
log
INFO ✅ Daemon successfully started and ready to accept requestsPress Ctrl + A + D to disconnect from screen session.
Verify daemon status (optional):
bash
curl <DAEMON_DOMAIN>:<DAEMON_PORT>/heartbeatSuccessful output looks like:
json
{
  "daemonID": "2f2d493591eca925e84a933953b769471078e7b2d96b37565a30d3ef37585bba",
  "timestamp": "1743002956",
  "status": "Online",
  "serviceheartbeat": {
    "serviceID": "<SERVICE_ID>",
    "status": "SERVING"
  },
  "daemonVersion": "v6.2.0",
  "trainingEnabled": false,
  "trainingInProto": false,
  "trainingMethods": [],
  "dynamicPricing": {},
  "blockchainEnabled": true,
  "blockchainNetwork": "main",
  "storageClientCertDetails": {
    "validFrom": "",
    "validTill": ""
  }
}