Explore
The SingularityNET Command Line Tools
The SingularityNET command line interface (CLI) is the primary tool for interacting with the platform’s smart contracts, managing deployed services, and managing funds. It is aimed at service providers. In the near future, it will be supplemented by a web-based dashboard and control panel.
The CLI provides commands to interface with the Blockchain in the following ways:
- creating and managing identities;
- registering and managing the organizations, members, services, types, and tags on the SingularityNET Registry;
- claiming funds from customers using MPE and payment channels;
- reading and writing metadata and Protobuf specs about AI services (these are stored on IPFS, while basic service parameters can be fetched from Blockchain contracts); and
- connecting to different networks like local testnets, Kovan, Ropsten, and the Ethereum mainnet.
The CLI also provides service development and deployment support. It can set up new services by generating service metadata, Protobuf specs, and code templates provided by the SingularityNET Foundation. The CLI interacts with daemons for each service. Security-wise, the CLI follows the same guidelines as provided by Ethereum for storing the private keys. When user identities are created and registered with a client, the CLI safely stores the details on the local machine and retrieves them only when it needs to interact with the Blockchain.
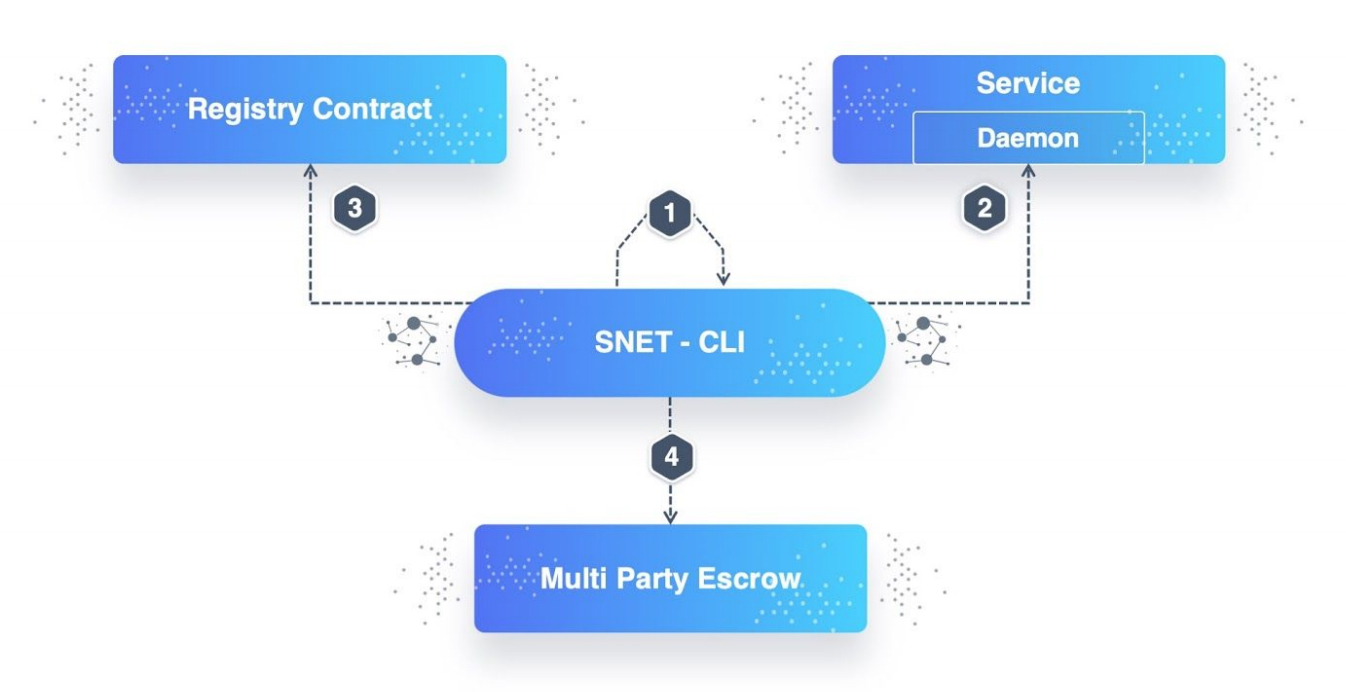
The CLI requires and connects to four critical components:
- User identity management. Involves user registration, managing identities and sessions, and locking/unlocking accounts for transacting with the Blockchain. This component is local to the machine where the CLI is run.
- Sidecar proxy. Communicates to servers hosting AI services.
- Registry contract. Deals with organizations, members, services, types, and tags.
- MPE contract. Sends and receives funds and manages other functions related to payment channels; e.g., closing a channel or extending its expiry date.
This tool is used extensively in our tutorials and guides, to install it, follow the setup guide.
See the CLI documentation for full details of actions the tool allows.
Making a call to a SingularityNET service
JSON parameters
While protocol buffers are used for communication, call parameters are represented as JSON on the command line.
There are three ways of passing this JSON:
- via a cmdline parameter;
- via JSON file; and
- via stdin.
For example, in this platform example we need to pass the following JSON as a parameter for the “add” method to our service:
{"a": 10, "b": 32}
We can use three ways:
# via cmdline parameter
snet client call 0 0.1 localhost:8080 add '{"a":10,"b":32}'

# via json file
echo '{"a":10,"b":32}' > p.txt
snet client call 0 0.1 localhost:8080 add p.txt

# via stdin
echo '{"a":10,"b":32}' | snet client call 0 0.1 localhost:8080 add
Modifiers
We’ve implemented several modifiers for this JSON parameter in order to simplify passing big files and to have the possibility to pass binary data (and not only base64 encoded data).
There are 3 possible modifiers:
- file - read from file;
- b64encode - encode to base64; and
- b64decode - decode from base64.
For example, if you pass the following JSON as a parameter, then as an “image” parameter we will use the base64 encoded content of “1.jpeg”
'{"image_type": "jpg", "file@b64encode@image": "1.jpeg"}'
If we remove the b64encode modifier from the previous example, then we will pass 1.jpeg image in binary format without base64 encoding.
#snet-sdk-python SingularityNET SDK for Python ##Getting Started These instructions are for the development and use of the SingularityNET SDK for Python. ###Usage The SingularityNET SDK allows you to import compiled client libraries for your service or services or choice and make calls to those services programmatically from your application by setting up state channels with the providers of those services and making gRPC calls to the SingularityNET daemons for those services by selecting a channel with sufficient funding and supplying the appropriate metadata for authentication. Once you have installed the snet-sdk in your current environment and it’s in your PYTHONPATH, you should import it and create an instance of the base sdk class:
from snet_sdk import Snet
import config
snet = Snet(private_key=config.private_key)
Now, the instance of the sdk can be used to instantiate clients for SingularityNET services. To interact with those services, the sdk needs to be supplied the compiled client libraries and a reference to their path on your file system.
To generate the client libraries, you need the SingularityNET Command Line Interface, or CLI, which you can download from PyPi, see https://github.com/singnet/snet-cli#installing-with-pip
Once you have the CLI installed, run the following command:
snet sdk generate-client-library python <org_id> <service_id>
snet sdk generate-client-library python
Optionally, you can specify an output path; otherwise it’s going to be ./client_libraries/python/
Now, by default the sdk is going to look for those client libraries in the ./grpc/
Once you have the generated client libraries in place, you can create an instance of a SingularityNET service client:
client = snet.client("<org_id>", "<service_id>")
The client exposes the following properties and methods:
- All of the modules from the generated client library as client.grpc.<module_name. These are temporarily added to your PYTHONPATH and imported at runtime
- Functions to open, fund and extend state channels
- Functions to retrieve the list of state channels between you and the service provider from the Blockchain
- Functions to get the updated state for a specific channel from the service provider, signed by yourself
- Functions to generate and sign the required metadata to make gRPC calls to the service daemon
This is an example of how to make a call to a SingularityNET service in the snet organization with the example-service service_id using the base SDK and client instances created as shown before:
stub = client.grpc.example_service_pb2_grpc.CalculatorStub(client.grpc_channel)
request = calculator.grpc.example_service_pb2.Numbers(a=10, b=12)
result = stub.add(request)
print(result)
If you have no open state channels with the service provider, you can create one by calling the following function: client.open_channel()
By default, this will create a channel with the shortest possible expiration date and the necessary amount to make 100 service calls.
Once an open channel is created and funded, the sdk will automatically find and use a funded, non-expired channel.
For more information about gRPC and how to use it with Python, please see:
- gRPC Basics - Python
- gRPC Python’s documentation
______________
##Development
Installing
###Prerequisites
- Python 3.6.5
- Node 8+ w/npm ______________ Clone the git repository
$ git clone git@github.com:singnet/snet-sdk-python.git
$ cd snet-sdk-python
•	Install development/test Blockchain dependencies
$ ./scripts/Blockchain install
•	Install the package in development/editable mode
$ pip install -e .
###Versioning We use SemVer for versioning. For the versions available, see the tags on this repository. ###License This project is licensed under the MIT License - see the LICENSE file for details.
snet-sdk-java
###How to build Integration testing is enabled by default. To run full build including integration tests use:
mvn install
Running integration tests is a time consuming process so to make fast build running unit tests only use:
mvn install -DskipITs
#snet-sdk-js
##Getting Started This repo hosts multiple SDKs for JavaScript. Currently supported platforms
- Node.js using grpc-node
- Browser (Web) using grpc-web
You can find more details about each sdk within the respective package folders.
- Node.js under packages/nodejs directory
- Web under packages/web directory
These SDKs are under active development and not ready for production use yet. If you find any bug or something doesn’t work as expected, please create an issue.
##Usage All the SDKs assume that there is enough eth balance to cover the gas cost and AGI tokens in the wallet to cover the service execution cost.
The SDKs chose a default Payment Channel Management Strategy, which is the simplest form of picking an existing Payment Channel if any or creates a new Payment Channel if no channel is found.
This can be easily overridden by providing your own strategy to the SDK at the time of construction. Documentation on creating custom strategies will be available soon. ##Development This is a monorepo which is setup a little differently. It does not use any external tools like lerna or any other popular tool.
There are 3 packages out of which only 2 of them are published to npm
- core
- nodejs (published)
- web (published)
The way the core package is shared across nodejs and web is by creating a symlink to core under each package. This setup has been tested on macOS and should work on any standard Linux distribution but it has not been tested on Windows OS.
Build
Navigate to the specific package which needs to be build and then run the following command npm run build
Publish
Navigate to the specific package which needs to be published and then run the following command npm run publish LICENSE file for details.
#snet-sdk-Java
Class diagram Image
##How to build
Integration testing is enabled by default. To run full build including integration tests use:
mvn install
Running integration tests is a time consuming process so to make fast build running unit tests only use:
mvn install -DskipITs
Last modified on : 11-Feb-20